D-Day for digital analytics is coming. On July 1, 2023, the free Universal Analytics properties will stop processing hits, i.e., they will stop collecting new data (paid Analytics 360 accounts will enjoy an additional year of leeway).
As if this were not dramatic enough, Google will soon announce the date from which we will no longer have access to previously processed data. We will no longer be able to access existing properties, view reports in the interface or access data via API. And of course, all processes and automations involving integration with Universal Analytics will also stop working.
So what do we do now, Google? Something, in fact, we should have done a long time ago…
In October 2020 Google announced the launch of Google Analytics 4 and since then, it recommended us to carry out a dual implementation in our digital assets. Why? Basically, in order to accumulate historical data.
GA4 is a measurement tool totally different from Universal Analytics that does not inherit the data from its previous version (no, it is not possible to export the data and then import it into GA4), so we are starting completely from scratch. Carrying out a dual implementation (UA+GA4) allowed us to continue measuring our projects with Universal Analytics but, at the same time, to accumulate historical data in the new GA4 properties.
You are probably already thinking about one of the first effects of ignoring Google’s recommendations. Indeed, if your digital assets did not have GA4 before July 2022, you will not be able to make year-over-year comparisons of your data in July 2023.
The worst thing is, bad news doesn’t end here. From the official launch of GA4 until today, the tool has undergone countless variations and evolutions that have caused some skepticism among analytics professionals. Changes in the interface, in the measurement model, emergence and disappearance of functionalities… And although the day of the definitive goodbye to Universal is approaching, GA4 seems not to be 100% complete yet and the changes will probably continue.
I am one of those analysts who have been stuck day by day with Google Analytics 4, and as I know that new beginnings are never easy, whether you are a newcomer to this wonderful world or one of the lucky ones who has historical data but still does not use GA4 on a regular basis, we bring you 10 tips that will make your life much easier and will prevent you from encountering problems that can greatly affect the measurement of your projects if you do not take them into account.
Dodge the pitfalls encountered in GA4 like a real ninja! Here we go👇
Table of Contents
GA4 data retention period
In Google Analytics 4 it is necessary to extend the data retention period since, by default, it will only retain event and user information for 2 months. If we do not make any changes to this period, we will not be able to see data beyond these two months in non-aggregated reports, such as exploration reports.
Although this does not affect the standard reports, which can be found in the GA4 interface by default, we must bear in mind that this type of report is quite limited and that, in order to go deeper into our data, we will often have to resort to exploratory reports.
So, if you want to see data beyond the last 2 months, you will need to change the data retention period.
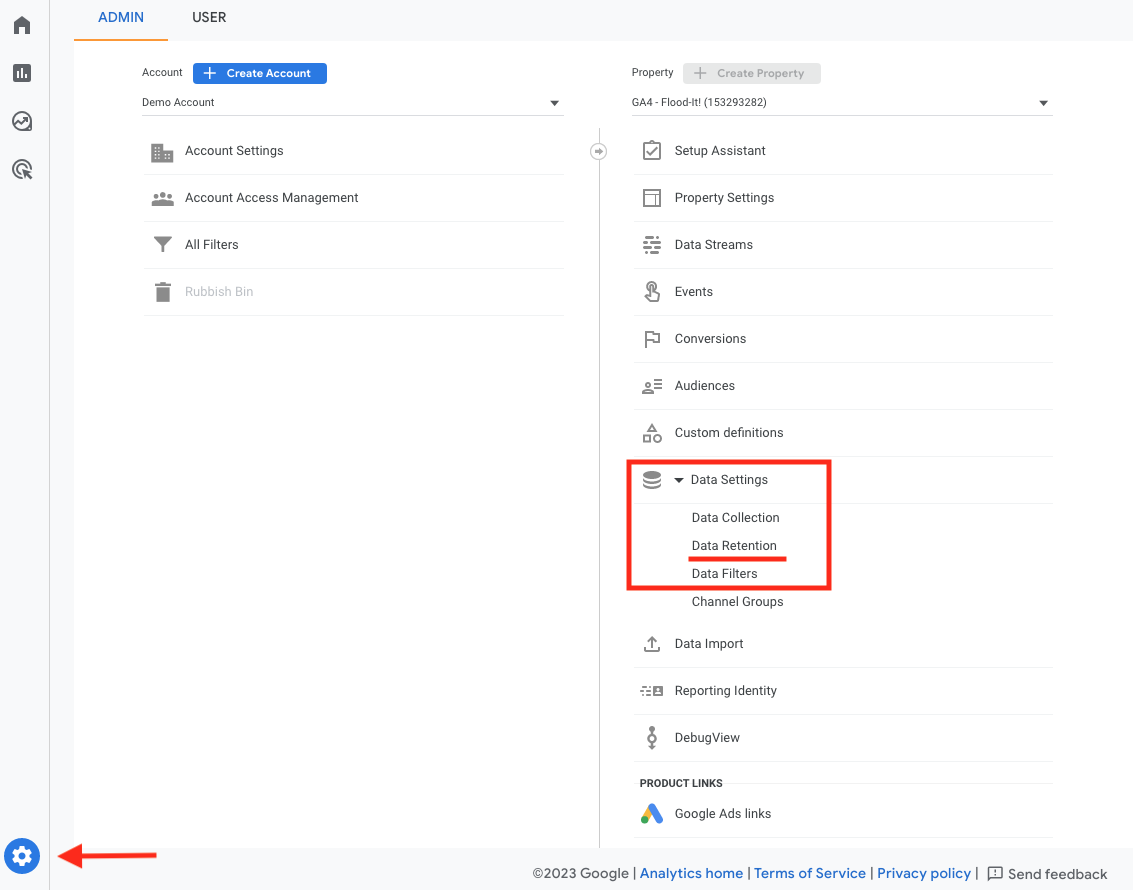
How? Go to Admin > in the property column click on Data Settings > click on Data Retention > change from 2 to 14 months (maximum allowed in GA4 free properties).
Analytics 4: Setting internal traffic filters
There are two types of filters available in Google Analytics 4 properties: the developer traffic filter and the internal traffic filter. In the first one, developer-triggered events need to have been marked with the debug_mode or debug_event parameter, something GTM does automatically.
In the case of internal traffic, it is necessary to perform a previous step on our part: we must tell Google Analytics which is the range of IPs to consider as internal traffic.
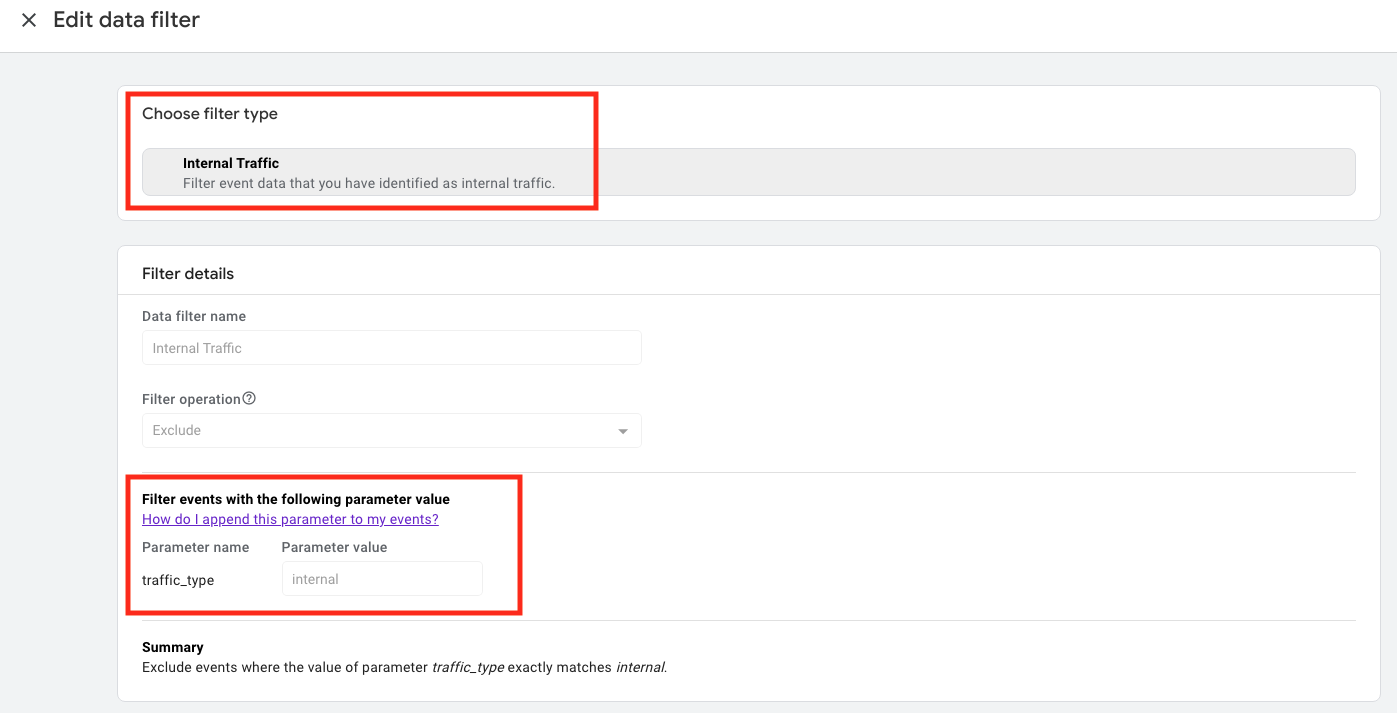
How do we do it? Go to Admin > Data Streams > select the stream > Configure tag settings > Define internal traffic. Here we create a new rule to define the traffic that must be marked as internal and, from that moment on, all the events made from any of those IP addresses will have the parameter “traffic_type”= internal (it is the default value, although we can change it).
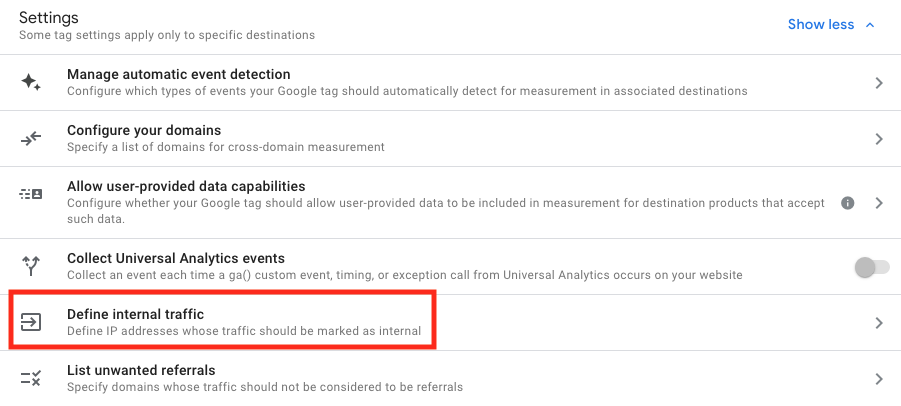
Now we can go back to “Data filters” and create our internal traffic filter. In addition, by playing with the value of the traffic_type parameter we can create many other filters based on IP addresses.
What types of states do filters have in GA4 and what are they for?
Filters created can be in 3 different states.
- Inactive: Google Analytics does not evaluate the filter and does not apply it.
- Active: Events that meet the condition set in the filter are not processed and we will not see them in our reports (this is the closest filter status to the one we had in Universal).
- Testing: Google Analytics will evaluate the filter, process all the data and mark the events that meet the filter conditions with the dimension “Test Data Filter Name”. That is, with this option we will see all the events generated, regardless of whether they meet the filter or not. However, those that do will be marked, so that we can exclude them later in our analysis.
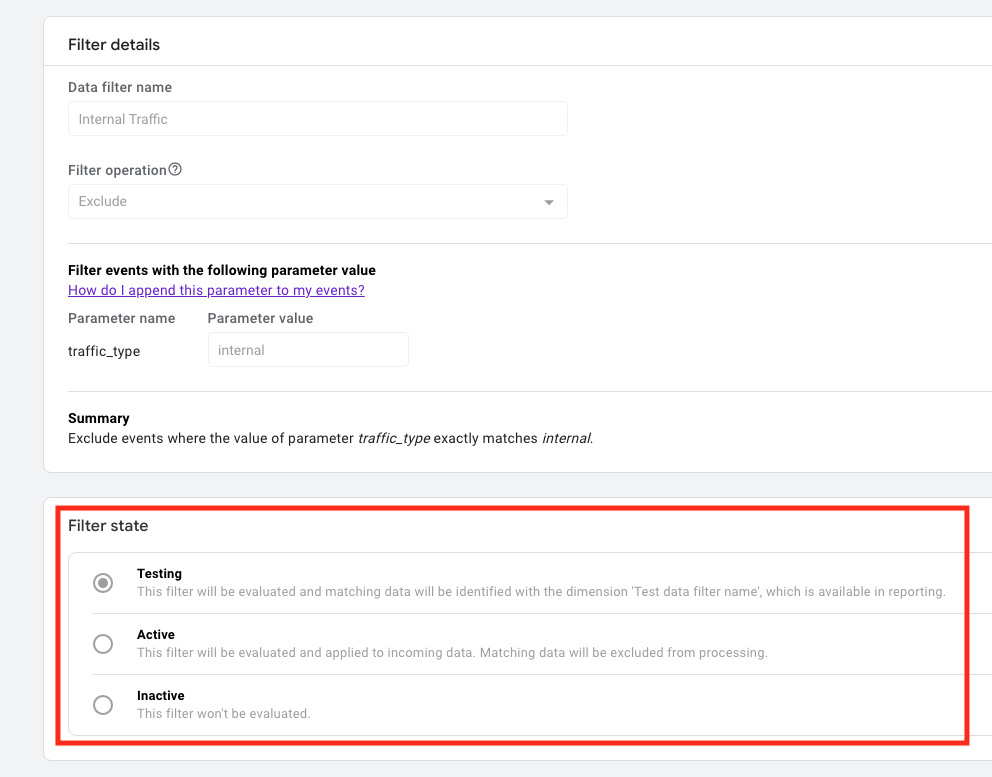
If we keep our internal traffic filter in test mode, we will be able to distinguish quickly and at a glance what part of the total traffic generated comes from our IPs. If we switch this filter to active, this traffic will simply disappear from our reports and we will not be able to see it.
Event parameters in GA4, a plus in your measurements
In Universal Analytics, when configuring an event, we had a category, action, tag and value to go deeper into the user interaction. Google Analytics 4 has gone a step further and now each event can have up to 25 parameters associated with it, with which we can detail the characteristics of the interaction.
For example, when a user views a product in our ecommerce, we can include parameters such as name, price, color, size, etc. that describe as much as possible the characteristics of the product.
Do not limit your implementations and take advantage of the great possibilities offered by the parameters!
How can I see the parameters associated with events in GA4?
Most of the parameters, unless they are preset by the tool and converted into dimensions by default (such as the page_location parameter) will not be visible in the GA4 interface (only in the real-time reports, but not in the rest of the reports).
So… why do I want 25 parameters if I can’t see them? Calm down, there is a solution!
To be able to see the parameters associated to the events in all the reports of the interface, we must elevate them to dimension, creating custom dimensions.
In order to do this, we must go to Admin > Custom definitions > Create custom dimensions.

Important! The name that we are going to put to the dimension can be whatever we want, however, in event parameter we have to indicate the exact name of the parameter that we want to collect within that dimension. Make sure that the name of the parameter coincides exactly with the one that you have put in GTM or in the code of the web.
How to not miss event parameters in Google Analytics 4
Within GA4, in addition to the events recommended by the tool and the customized events that we create according to the needs of our business, there are two types of events that are collected practically inadvertently and that can make life much easier for those who lack technical knowledge. These are automatic events and enhanced measurement events.
- Automatic events: These are automatically collected when the tracking code is loaded. They are necessary for the tool to work, and we cannot prevent them from being sent (for example, the page_view or session_start event).
- Enhanced event measurement: Enables us to measure basic user interactions without the need for technical implementation, simply by enabling them from the GA4 interface (e.g., scroll event, outgoing click or file download).
With all events, including custom events, GA4 collects five parameters by default: language, page_location, page_referrer, page_title and screen_resolution.
Therefore, when creating a new event, it will not be necessary to include these parameters among the 25 available, as they will already be collected in any case. While it is true that it will be very rare that we need all 25 parameters to complete the information of an event, the inclusion of those that are automatically collected can only lead us to make mistakes that will harm the measurement. Don’t worry about them, GA4 already collects them for us!
How to name parameters in GA4?
With Google Analytics 4 we have great flexibility when it comes to configuring our events and their parameters, especially custom ones, however, there are certain limitations to our creativity that we must be aware of.
A very common problem is to do all the labeling of our digital asset, create custom events, associate parameters to them and, when we go to the GA4 interface to raise these parameters to dimension… Bam! An alert appears and the tool does not allow us. Why?
It is possible that the name we have chosen for the parameter does not meet the requirements of GA4. The length of the parameter name must be 40 characters or less and can only contain letters, numbers or underscores ( do not put spaces in the name!). In addition, it must always start with a letter.
Keep this in mind from the outset so that you don’t have to modify the entire implementation and labeling process.
Is it possible to optimize enhanced measurement?
As mentioned above, the enhanced measurement events that are triggered directly from the GA4 interface, without any technical implementation, make life much easier for us. However, it may be that not all the events available within this option are necessary for us. If our website does not have a search engine, why do we want to have the Site Search event active?
Take a walk through the improved measurement and adapt it to your needs. Also, keep in mind that these events are not always triggered when we are interested in them… So, if one of them does not suit your needs, the best thing to do is to deactivate it and implement it manually yourself.
Conversion events in GA4: How are they configured?
In Google Analytics 4 the conversion events replace the goals that we had in Universal and its configuration is very simple.
We just have to go to the Admin panel > Conversions > New conversion event. We put the name of the event we want to consider as a conversion and that’s it. We will now be able to see the total conversion metrics (and separated by event) in our reports.

There is an alternative way to do it, from the Events section within the Admin panel. There we will see a list of all the events that have been activated in the chosen period and we can easily and quickly mark those that we want to consider as conversion.
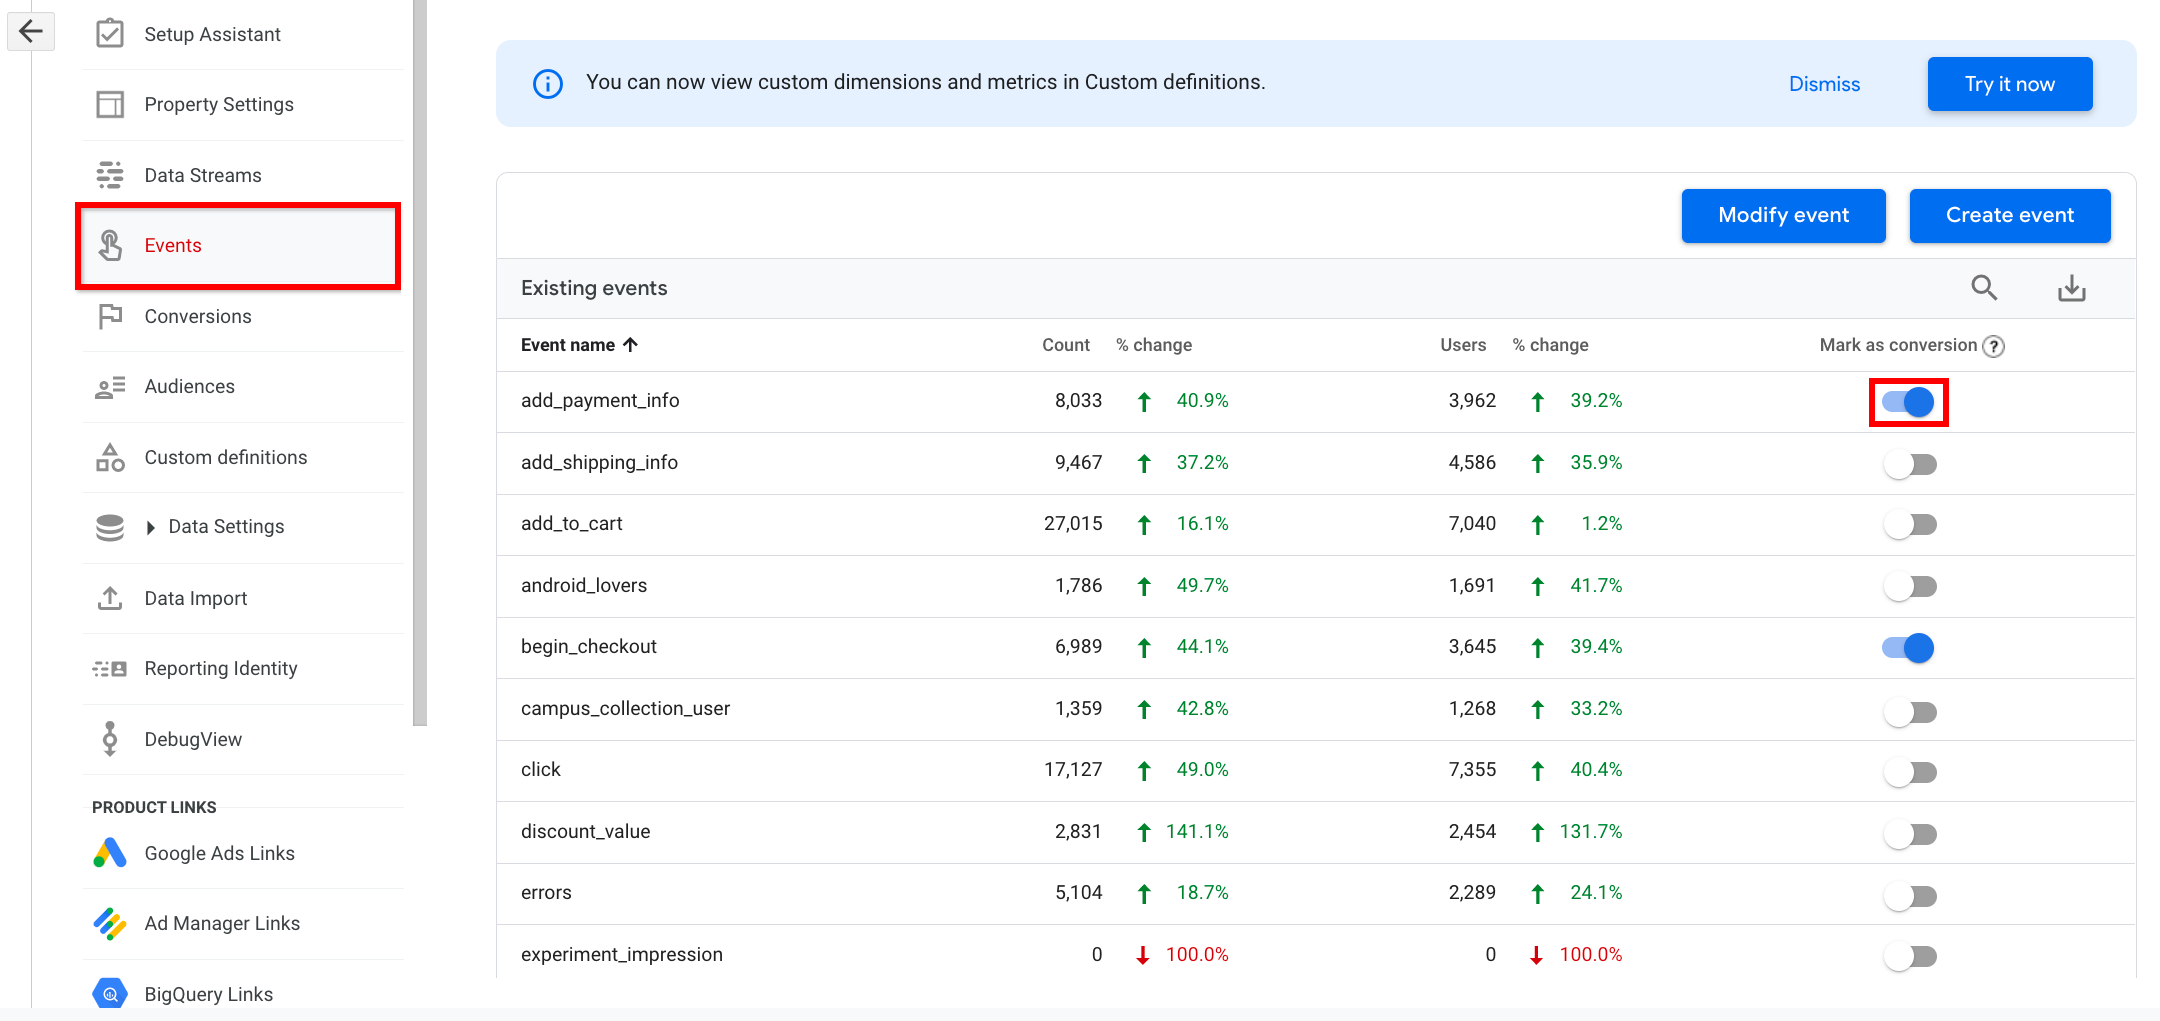
It is important to note that the conversions are based on the name of the events, i.e. we cannot mark a certain parameter value as a conversion… At least at first. What if I want to mark as a conversion the download of a certain file, but not of all the files? Well, it is possible to create new events from existing events from the GA4 interface itself, but we will see this in future blog posts.
Universal Analytics vs GA4: Can data be compared?
Last but most important point. Repeat it as many times as necessary until it is assimilated: “I must not compare UA data with GA4 data. I MUST NOT compare UA data with GA4 data.”
Although GA4 can be considered an evolution of Universal Analytics, the truth is that we are dealing with two tools that have very little to do with each other, with a very different data model and a completely different measurement paradigm. Do not be tempted to compare metrics because it will mislead you!
Yes, we know. Saying goodbye to an old friend and stepping into the unknown is not easy, but we hope these tips will make your GA4 journey a little easier.
And most importantly, have no fear! Because digital analytics is like life itself. Try, fail and try again until you succeed.
